Projet impression 3D

Hello, nous avons la chance d’avoir une imprimante 3D au bureau donc vous vous doutez bien que je m’amuse à imprimer des objets divers et variés 🙂

Ci-dessous un pied pour bloquer une carte électronique ou des fils pour souder, ça sert de troisième main pour des mini montages.

image

Audi A3 TFSI engine-coolant-temperature-sensor-location

Original post : http://www.audi-sport.net/xf/threads/2-0-fsi-engine-coolant-temperature-sensor-location.159072/

This is a little walk through I did on another site for the 2.0T FSI. Most elements should be the same. Might help someone here.

Parts required:
1. 06A919501A 2pin temp sensor
2. N90316802 O-Ring
3. Retaining Clip (Can re-use old one, but worth getting a new one just in case you break it)
4. G12 Coolant

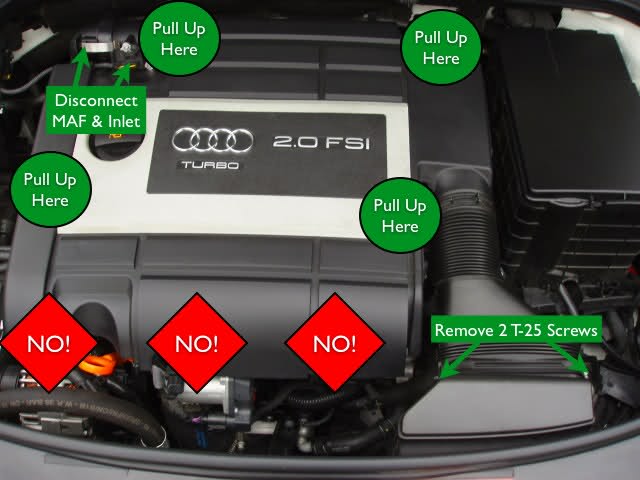
1. Remove intake/engine cover
2. Take off coolant reservoir cap (de-pressurises the coolant system a little im told)
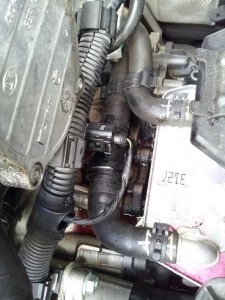
3. Locate temp sensor on right side of engine block
4. Put your fingers around the side of the sensor about half way down it towards the engine block and
push the retaining clip off the sensor towards the engine bay firewall.
5. Have the new temp sensor with O-ring on it ready to install in one hand and pull out the old temp sensor with the other.
Coolant will pour out everywhere as soon as you pull out the sensor.
6. Hopefully at this point the old O-ring comes out with the sensor you’re replacing. Mine didn’t and I had to fumble around to find it with coolant going everywhere.
7. Install new sensor and secure in place with new retaining clip
8. Take plug off old sensor with a flat head screwdriver. Clip into place on the new sensor.
9. Top up with coolant, reinstall intake/engine cover and clear fault codes if you have them (I didnt).
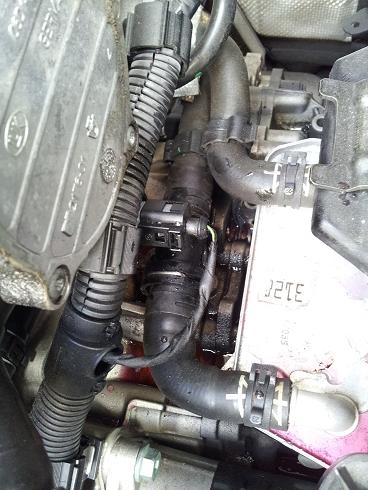
You’re working on this side of the engine

audi1

Sensor in centre of picture.

audi2

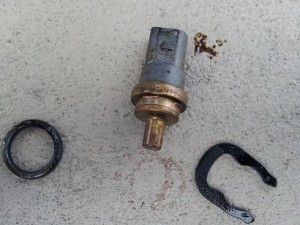
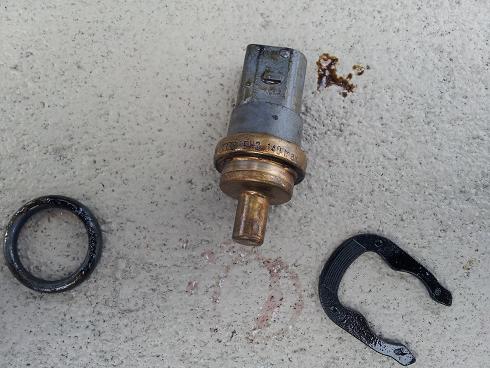
Old Temp Sensor, retaining clip & o-ring

audi3

How to change air filter remove engine cover basic Audi A3 TFSI

Original post : http://forums.vwvortex.com/showthread.php?4757987

How to change air filter remove engine cover basic? 2.0t fsi

* Unplug the Mass Air Flow (MAF) sensor.
* Undo the spring clips and pull out the turbo inlet connector.
* Remove the two T-25 screws on the air snorkle as shown below.
* Remove the engine cover by pulling up HARD where indicated by the green circles in the photo below.
* DO NOT APPLY ANY FORCE where indicated by the red diamonds in the photo below.
* If it’s cold weather, make sure the engine is warm so that the rubber grommets warm up and are flexible enough to come off. Cold, brittle plastic and stiff grommets will lead to a broken airbox/cover even if you otherwise do everything correctly.
* Pull up on the rear driver’s corner (near the battery box) first, then the rear corner where the MAF sensor is, then the fronts.

e9830z

Projet sableuse / sandblasting

Cela fait des années que j’ai en tête de fabriquer une sableuse d’établi pour nettoyer des petites et moyennes pièces de métal peu importe la provenance 🙂
J’ai acheté alors que j’étais encore en France mon pistolet que j’ai ramené au Canada.
J’ai fait quelques recherches sur internet et je suis parti des pièces que je possédait déjà.

Les besoins sont :
– Une caisse, boite en plastique
– Des gants assez large
– Des adaptateurs ronds pour fixer entre aux gants entre l’extérieur et l’intérieur
– Un pistolet à sabler
– Un boyau pour connecter le pistolet au compresseur
– Une vitre en verre ou plexiglas
– Idéalement une lampe néon dans la longueur
– Un compresseur avec assez de puissance, dans mon cas un 5HP
– Du sable pour sandblaster

1ère étape

image

image

image

image

2ème étape